2024.11.14 - [개발노트/Flutter] - Flutter 프로젝트에서 Firebase 이용하기 (공통 설정)
1. Apple Developers 설정
인증서, 식별자 및 프로파일 카테고리에서 ```식별자(Identifiers)```를 선택한다.
→ 개발 중인 앱 아이디에 들어가서 ```Push Notification``` 기능을 활성화한다.
이후 좌측 메뉴에서 ```Keys```를 선택한다.
→ APNS 키를 생성한다.
❗️ iOS 키파일 나올때마다 적는데, 한 번 다운로드 받으면 이후 분실 시에도 재다운로드 받을 수 없으니 잘 보관해야 한다
2. Firebase Console 설정
좌측 톱니바퀴 모양 → 프로젝트 설정 → 클라우드 메세징
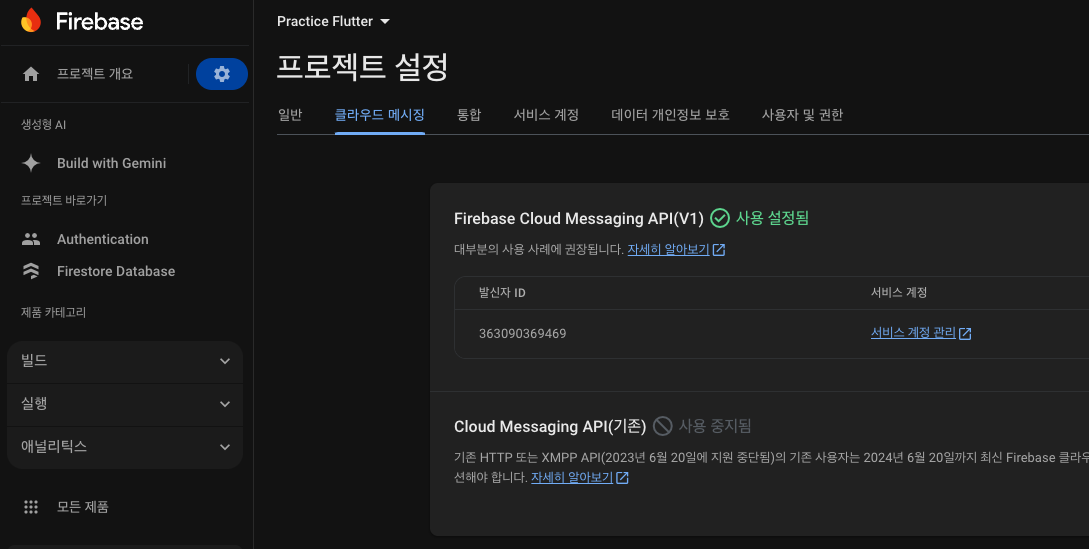

스크롤 조금만 내리면 인증키 업로드하는 칸이 있다.
1번에서 다운로드 받은 p8 파일을 추가해주면 된다.
(잘못 추가한 macos의 흔적..)
3. 프로젝트 설정
3-a. iOS Capability 추가
Xcdoe → project → targets → Signing & Capabilities
여기서 Push Notification.. 에엥?


각설, 원래는 이 기능을 체크해서 활성화했던 것 같은데 지금은 아니면 일단 넘어가고,
Bacground Modes 섹션에 있는 ```Remote notifications``` 기능도 체크해서 활성화해준다.
사실 네이티브 프로젝트에서는 FCM만 쓸거면 Remote notifications는 체크하지 않아도 된다는 글을 봤는데,
플러터 앱의 경우는 이걸 체크 안 해주면 아래 에러가 발생한다.
You've implemented -[<UIApplicationDelegate> application:didReceiveRemoteNotification:fetchCompletionHandler:], but you still need to add "remote-notification" to the list of your supported UIBackgroundModes in your Info.plist.
+ 필요하다면 google plist 파일도 다운로드 받아서 업데이트 해준다.
3-b. AppDelegate.swift에 필요한 코드 추가
import UIKit
import Flutter
import Firebase
import FirebaseMessaging

@UIApplicationMain
@objc class AppDelegate: FlutterAppDelegate, MessagingDelegate {
	override func application(
		_ application: UIApplication,
		didFinishLaunchingWithOptions launchOptions: [UIApplication.LaunchOptionsKey: Any]?
	) -> Bool {
		Messaging.messaging().delegate = self;
		FirebaseApp.configure()
		GeneratedPluginRegistrant.register(with: self)
		Messaging.messaging().isAutoInitEnabled = true;
		self.registerForFirebaseNotification(application: application);
		return super.application(application, didFinishLaunchingWithOptions: launchOptions)
	}

	override func application(_ application: UIApplication, didRegisterForRemoteNotificationsWithDeviceToken deviceToken : Data){
		print("X__APNS: \(String(describing: deviceToken))")
		Messaging.messaging().apnsToken = deviceToken;
		//Messaging.messaging().setAPNSToken(deviceToken, type:MessagingAPNSTokenType.prod )
	}

	override func application(_ application: UIApplication, didFailToRegisterForRemoteNotificationsWithError error: Error) {
		print("X_ERR",error);
	}

	func registerForFirebaseNotification(application : UIApplication){
		//    Messaging.messaging().delegate     = self;
		if #available(iOS 10.0, *) {
			//UNUserNotificationCenter.current().delegate = self ;
			let authOpt : UNAuthorizationOptions = [.alert, .badge, .sound];
			UNUserNotificationCenter.current().requestAuthorization(options: authOpt, completionHandler: {_, _ in})
			UNUserNotificationCenter.current().delegate = self ;
		}else{
			let settings : UIUserNotificationSettings = UIUserNotificationSettings(types: [.alert, .badge, .sound], categories: nil)
			application.registerUserNotificationSettings(settings);
		}
		application.registerForRemoteNotifications();
	}
}
추가. Postman FCM 전송 테스트
백엔드 팀에서 아직 FCM 서버를 작업해주지 못한 상황인데,
Firebase console에서 테스트를 해보기엔 data payload 부분이 복잡하다면 postman을 통해서 FCM을 보내볼 수도 있다.
프로젝트의 데이터 수신 형태에 따라 적당히 매만져서 사용하면 된다.
2024.11.16 - [개발노트/Flutter] - Flutter 프로젝트에서 Google Login 설정하기
2024.11.17 - [개발노트/Flutter] - Flutter 프로젝트에서 Apple Login 설정하기
2024.11.07 - [개발노트/Flutter] - Firebase Console 프로젝트 변경 (ver. Flutter)
'개발노트 > Flutter' 카테고리의 다른 글
| Flutter에서 Firebase Authentication으로 이메일 로그인 구현하기 (0) | 2024.11.24 |
|---|---|
| Flutter에서 로컬 DB 구현하기 (SQFlite) (2) | 2024.11.23 |
| Flutter 프로젝트에서 Apple Login 설정하기 (1) | 2024.11.17 |
| Flutter 프로젝트에서 Google Login 설정하기 (2) | 2024.11.16 |
| Flutter 프로젝트에서 Firebase 이용하기 (공통 설정) (2) | 2024.11.14 |